今回はGitLab CI/CDを使い始めるため、GitLabの案内するチュートリアルをやってみたのでそちらの紹介です。
GitLab CI/CDとは
GitLabのCI/CDを理解するうえで、事前にいくつかの用語を整理しておきます。
.gitlab-ci.yml
GitLab CI/CDを利用するには、GitLab Projectのルート直下に .gitlab-ci.yml というファイルを配置する必要があります。このファイルはGitLab CI/CDの設定や処理内容を定義するファイルであり、ここに記載された内容に従ってCI/CDを実行します。なお、 .gitlab-ci.yml というファイル名は別のものでも利用可能で、その場合はCI/CDの設定からファイル名を変更して実現します。
Runner
RunnerはGitLab CI/CDを実行するエージェントです。このエージェントは物理・仮想環境どちらでも利用可能です。
.gitlab-ci.yml にはジョブを実行するのに利用するコンテナイメージを指定できます。Runnerは指定されたイメージを取得し、GitLab Projectを取得し、エージェントのローカル、またはコンテナイメージ上でジョブを実行します。
SaaSを利用する場合、ユーザーが設定することで外部のホストをRunnerとして利用することもできますが、GitLabのホストする共有Runnerを最初から利用できます。共有Runnerは、複数のOSやCPU/GPU、インスタンスサイズの違うものから好きなものを利用できます。特に指定がない場合は Smallサイズ (2vCPU / 8GB)の Linux インスタンスが選択されます。なお、共有Runnerの利用できる上限は、契約しているプランによって変動します。
GitLab Self-managedの場合、新たにRunnerを登録するか、GitLabをホストするサーバー上にRunnerを導入することが可能です。
Pipeline
Pipelineは主に Job と Stage から成り立ちます。
Job には、例えば「Dockerfileからコンテナイメージをビルドする」「Pythonのアプリケーションに対して単体テストを実行する」「AWS上のEC2インスタンスにデプロイする」など、CI/CDの中で実行したいことを定義します。
Stage は1つ以上のJobを含み、いつJobを実行するかを決定します。同じStageに含まれるJobは同じタイミングで実行されます。典型的なStageは build test deploy などになります。
CI/CD variables
GitLab CI/CDではいくつかの環境変数が利用できます。これらの環境変数はどのJobからも呼び出し可能であり、これを利用することでJobやPipelineのふるまいを制御したり、Pipeline内で再利用したい値を一時的に保存したりすることができます。
CI/CD component
CI/CD componentsは再利用可能な単一のPipelineを構成するユニットです。componentsを利用することで、同一のPipelineコードを繰り返し記載することを避けることができたり、小さなPipelineを組み合わせて巨大なPipelineを構成することもできます。
チュートリアルの流れ
ここからはGitLabのチュートリアルに沿って .gitlab-ci.yml の作成からCI/CDの実行までを行います。
前提条件
チュートリアルを実施するには、いくつか前提条件があります。
- (特に記載ありませんが) GitLab SaaSが利用可能な状態であること
- GitLab Projectを作成済みであること
- 操作するアカウントが、プロジェクトに対して
MaintainerまたはOwnerRoleを付与されていること
今回は saas-cicd-example というプロジェクトを作成しました。またアカウントは Owner Roleを付与しています。

Runnerの確認
まず利用可能なRunnerがあるかを確認します。
Runnerの情報を表示するには、Projectの 設定 から CI/CD を選択し、その先にある Runner の項目を確認します。
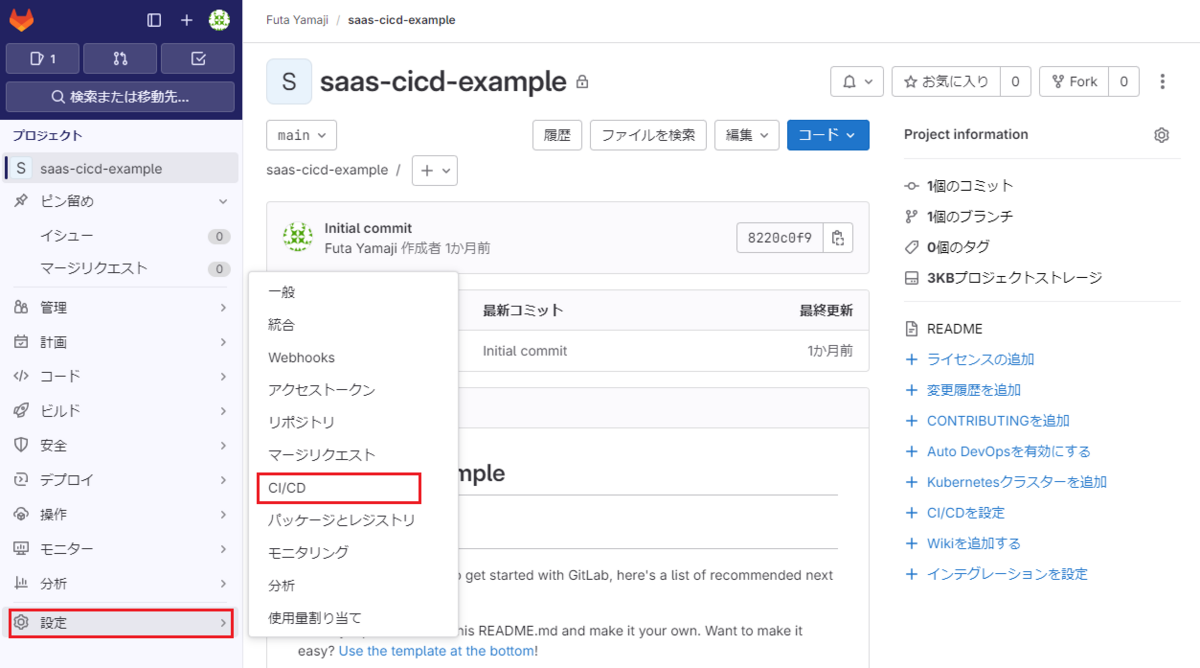
Runner という項目の 展開 をクリックすると、利用可能なRunnerが表示されます。

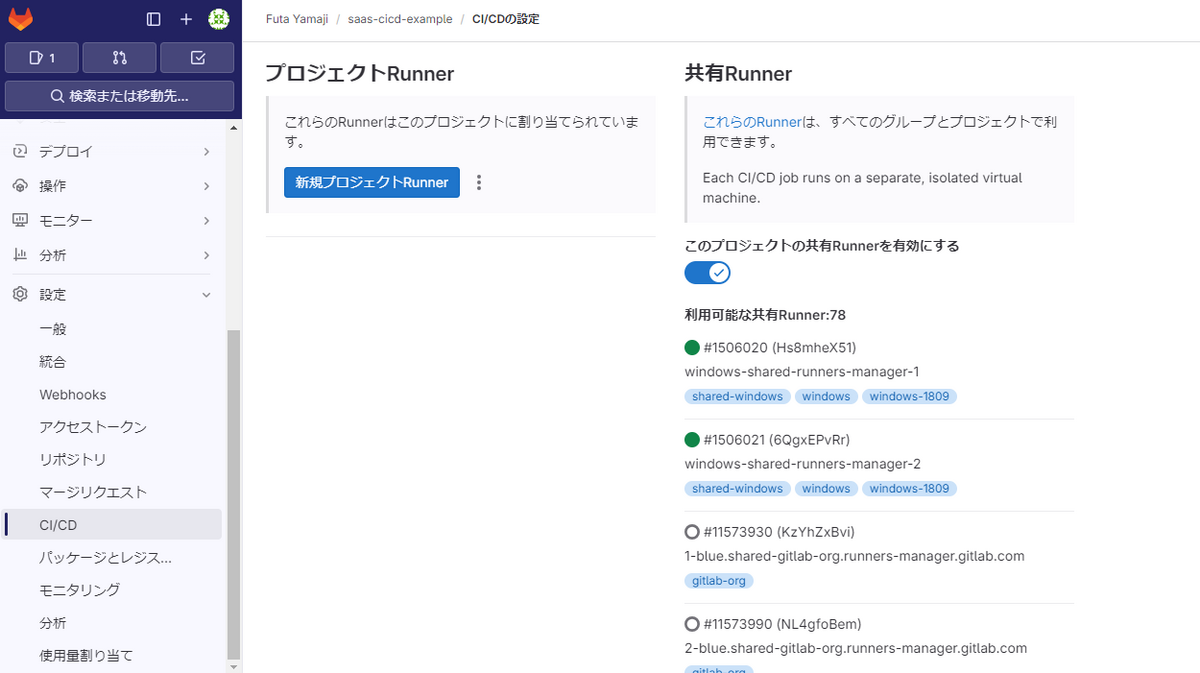
今回は利用可能なRunnerは78台あることが表示されています。ここで最低1台、緑色で表示されているRunnerが存在すれば、利用可能なRunnerがあることを意味します。
.gitlab-ci.ymlの作成
Runnerの存在を確認したので、次に .gitlab-ci.yml を作成します。といってもここではアプリケーションコードやリソースなどの作成は行わず、テキストメッセージをログ上に出力するだけになります。
まず、今回の .gitlab-ci.yml を以下に示します。
build-job:
  stage: build
  script:
    - echo "Hello, $GITLAB_USER_LOGIN!"

test-job1:
  stage: test
  script:
    - echo "This job tests something"

test-job2:
  stage: test
  script:
    - echo "This job tests something, but takes more time than test-job1."
    - echo "After the echo commands complete, it runs the sleep command for 20 seconds"
    - echo "which simulates a test that runs 20 seconds longer than test-job1"
    - sleep 20

deploy-prod:
  stage: deploy
  script:
    - echo "This job deploys something from the $CI_COMMIT_BRANCH branch,"
  environment: production
上記ファイルをProject上で作成し配置します。今回はGitLab UI上で新規ファイルを作成し、ファイル作成後は main ブランチに対し直接コミットします。
コミットするとPipelineが起動します。
ここで、今回の .gitlab-ci.yml について補足します。
Job
まずこのファイルを見ると、大きく以下のような構成となっていることがわかります。
<Jobの名称>:
  stage: <stageの名称>
  script: <scriptの内容>
.gitlab-ci.yml の基本的な使い方として、Job単位で処理を分けます。そして各Jobの中でStageやscriptを定義し、いつ・どんな処理を行うか定義します。
さらに一番最後の deploy-prod というJobは、stage・scriptに加えて environment という項目があります。これはJobがデプロイする先のenvironmentを定義しています。
environment はコードがデプロイされた場所を示すものです。これを利用すると、各環境に対するデプロイ履歴を管理し、どのサーバに何がデプロイされているかを知ることができます。またenvironmentはデプロイ先のURLを表示したり、使わなくなったenvironmentを簡単に削除したりもできます。
Stage
次に各Jobに設定された stage を見てみます。 stageとはjobを実行するタイミングを制御するものと説明しましたが、この .gitlab-ci.yml を実行したあとにパイプラインを確認すると以下のようになります。
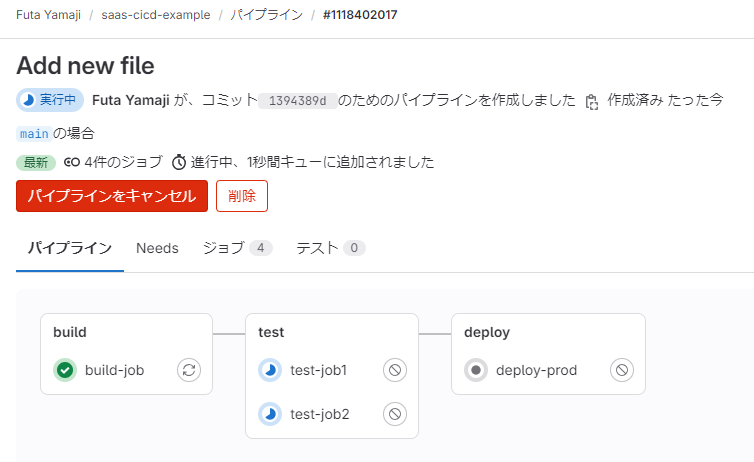
特徴的なのは test というStageに2つのJobが含まれていることです。ここでStageに含まれる test-job1 test-job2 というJobは、どちらも stage: test と定義されています。
このように、同じStageを指定したJobは同じタイミングで実行されることがわかります。
CI/CD variables
最後に今回の .gitlab-ci.yml に含まれるCI/CD variablesについてみてみます。ここでは GITLAB_USER_LOGIN CI_COMMIT_BRANCH という2つの変数を確認できます。
これら変数は、それぞれ以下の値を提供します。
GITLAB_USER_LOGIN: パイプラインまたはJobを開始したユーザーの名称を含みます。CI_COMMIT_BRANCH: コミットブランチの名称を含みます。
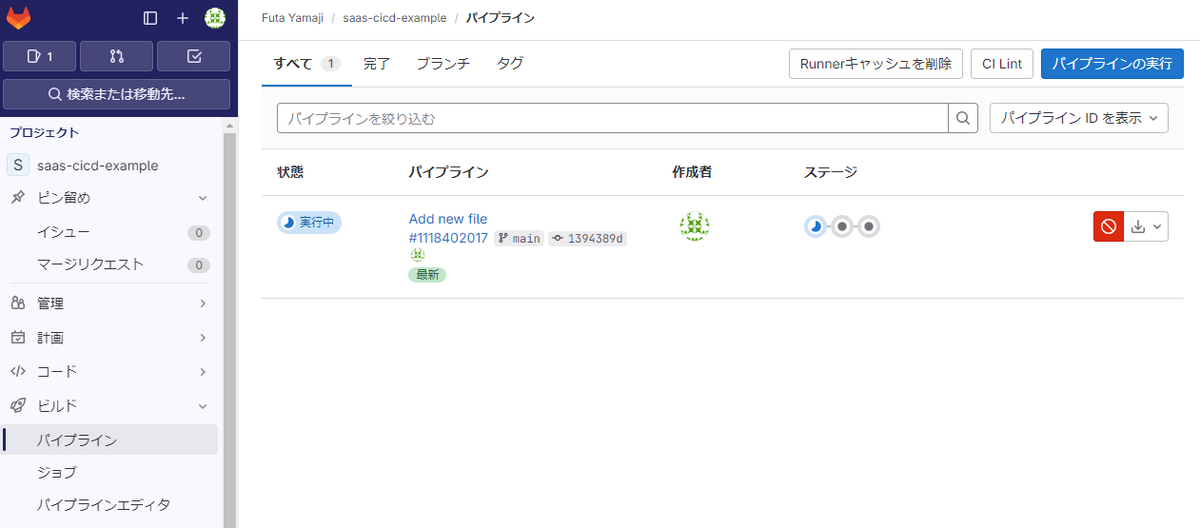
パイプラインの確認
パイプラインが開始したので、 ビルド から パイプライン を選択します。パイプラインが1つ実行中なのでパイプラインID (ここでは 1118402017 ) を選択します。

いくつかのJobが実行中であることが確認できます。

ここでJobを1つ選択すると、Jobの実行ログや実行期間、使用したRunner、関連するJobなどの情報が表示されます。

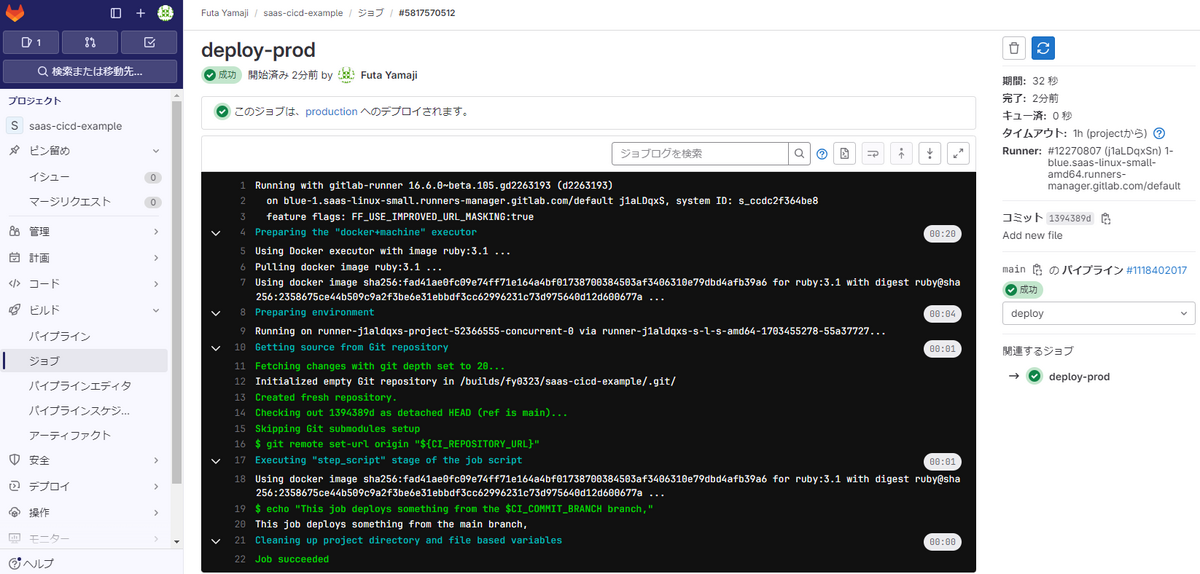
しばらくするとパイプラインが完了するので、最後に実行される deploy-prod を選択します。こちらも同様に実行ログなどが確認できます。
最後にパイプラインについて補足します。
ログの見方
ここでは deploy-prod を例に、Jobのログについて簡単に見ていきます。
最初にGItLab Runnerの情報が出力されます。ここでGitLabのバージョン情報、使用するRunnerの名称などがわかります。

次にRunnerの実行環境を設定します。デフォルトでは ruby:3.1 のDocker環境を利用するため、DockerイメージのPullなどを実行します。

次に environment の準備を行います。
![]()
続いてGitリポジトリからソースを取得します。ここでは git fetch –depth 20 のような内容でGitの履歴を取得します。その後最新のコミットにcheckout、リモートURLの設定などを行います。

次にJobに定義されたscriptを実行します。今回は echo で特定の文字列を出力するだけですが、その処理が行われていることも確認できます。

最後にディレクトリやファイルをクリーンアップし、ジョブの完了を表示して完了です。
environment
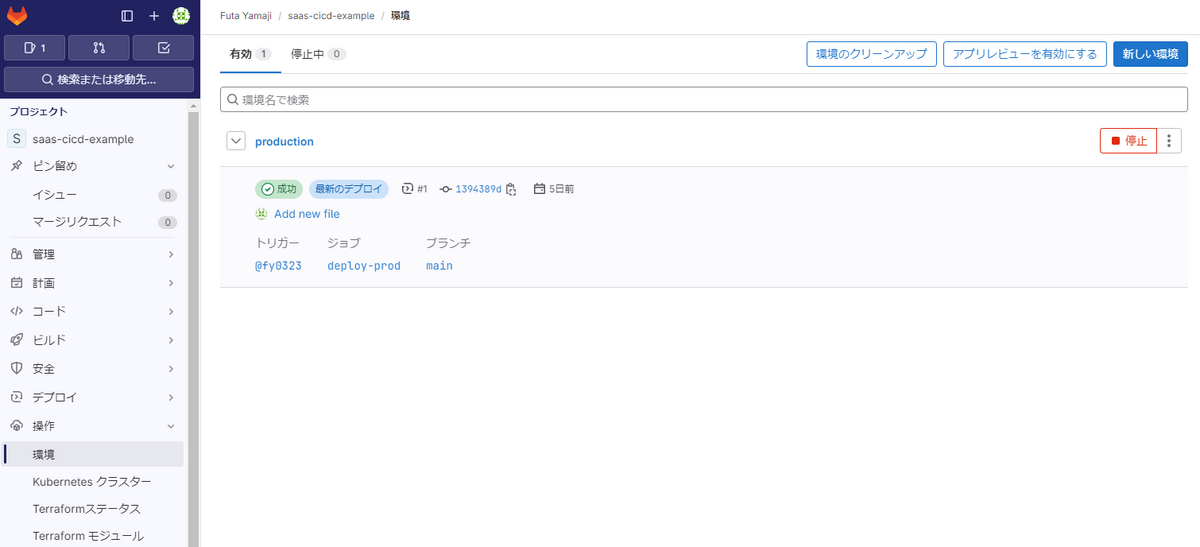
今回のパイプラインを実行後、 environment のページに移動すると、 production というenvironment が作成されているのを確認できます。左メニューの 操作 から 環境 を選択します。
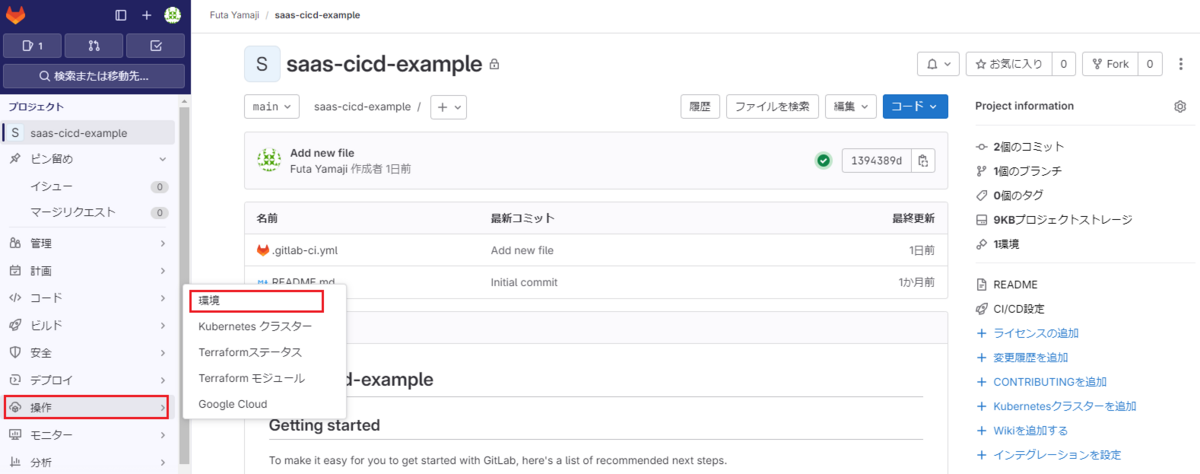
遷移先の画面で production を確認できます。