今回は汎用的な環境に対してポリシーエンジンを提供するOpen Policy Agent(OPA)について調査しました。
Policy as Codeとは
OPAを操作する前に、Policy as Codeというコンセプトについて少し触れます。Policy as CodeはHashiCorp社がSentinelというツールを発表した際に用いたコンセプト(Twitterで検索したところ、用語自体はこれが初出ではなさそう)で、名前の通りアクセスポリシーなどをコードとして記述・管理可能とすることを意味します。ポリシーをコードで表現することで、バージョン管理や自動テストなどのベストプラクティスをポリシー定義に対して適用できるようになります。
TerraformやAnsibleなど様々なプロダクトが登場し、インフラをコードで管理するInfrastructure as Code (IaC)が進むことで、インフラの構築・運用の自動化やバージョン管理などが普及しています。その一方で、各リソースを定義するコードに記述ミスが含まれれば、それはインフラの障害につながります。IaCが普及することで、そのような記述ミスが及ぼす影響範囲が拡大し、これを事前に防ぐための機構が求められました。
Sentinelのドキュメントには、Policy as Codeを導入することで得られるメリットを、以下のように紹介しています。
Sandboxing: 自動化されたシステムに対する枠組み(ポリシー)を提供する。自動化された領域が増えるほど、危険な振る舞いを行うリスクが高まるが、それらを手動でチェックするのでなく、ポリシーをコードとして定義することで検証を可能にする。
Codification: ポリシーをコードで定義することで、どのようなポリシーが設定されているかをコードから知ることが可能になる。また必要な場合はコメントを追加し、コードの理解をサポートすることもできる。
Version Control: コードとして管理することでGitによるバージョン管理を可能にし、履歴や差分、Pull Requestなどの機能を利用することができる。
Testing: アプリ開発のCIサイクルにポリシーテストを組み込むことができる。GitHubなどと組み合わせることで、Pull Requestをトリガーとした自動ポリシーテストなどを行い、Mergeする前に検証を行うことができる。
Automation: Testingとも重なるが、コードで定義することで、各種自動化ツールに取り込むことが容易になる。
Sentinelが登場してから数年が経過した現在、多くの企業はアプリケーションのコンテナ化を進め、コンテナ実行基盤としてKubernetesが業界標準となっています。KubernetesではYAML形式で記述されたマニフェストファイルに、実行するコンテナの種類や設定などを定義し、宣言的にリソースの作成・管理を行います。Kubernetes上でコンテナを管理することで、アプリケーションの可用性や拡張性などを獲得し、大規模環境においても安定したシステムパフォーマンスを実現することが可能になります。
一方、各アプリケーションやその他リソースを定義するマニフェストファイルは、システムが拡大するほど増加し、その構成は複雑になります。それらはWall of YAMLとも表現されるほど増加する場合があり、大量のYAMLファイルを管理するためにHelmやKustomizeなどのマニフェストファイル管理ツールも登場しました。
※参考ドキュメント:
また、Kubernetesを利用する組織やプロジェクトによっては、独自のポリシーを指定している場合もあります。マニフェストファイルが増加するほど、それらが組織のポリシーに従っているかをチェックするのは困難になり、ポリシーを違反する可能性も高くなります。
これを防ぐアプローチとしては、①マニフェストファイルをデプロイする前にファイルを検証する、②マニフェスト適用後のValidationチェック機能で検知する、の2つに大きく分かれるかと思います。デプロイ前のチェックツールは以前の記事中にて簡単に紹介させていただきました。今回はデプロイ実行後にポリシー違反を検出するプロダクトの一つとしてOpen Policy Agentを取り上げました。
Open Policy Agentとは
Open Policy Agentは複数の環境で利用できる汎用的なポリシーエンジンを提供するOSSです。環境全体で共通のポリシーエンジンとして利用することが可能なため、ポリシーの定義をOPAにてすべて管理することが可能になります。
OPAには以下のような特徴が備わっています。
Policy Decoupling: あるソフトウェアがポリシーの判断を必要とする場合、ソフトウェアはJsonなどの構造化データをOPAに提供し、OPAはその入力データを評価します。評価結果は任意の構造化データとして返し、ポリシーに違反した場合は何らかの処理を実行することができます。OPAではポリシーによる検証をソフトウェア外部に分離することで、ポリシーの設定や更新を、ソフトウェアへの影響なしに実行することができます。
Regoによる記述: OPAはRegoという言語を用いてポリシーを定義し、先ほどのPolicy as Codeを実現します。RegoはDataLogというクエリ言語にインスパイアされており、DataLogがJSONのような構造化された形式をサポートするよう拡張されています。Regoを採用する理由として、Nestedなデータを参照するためのサポートを提供すること、クエリが正確で曖昧さを排除したものであること、宣言型のクエリ言語であり、命令型の言語と比べてシンプルに記述できること、クエリの最適化によるパフォーマンス向上ができること、などを挙げています。
複数の環境で利用可能: OPAは汎用的なポリシーエンジンであり、Kubernetesだけでなく、Docker・Linux・Terraform・Envoy・Kafkaなど様々な環境・プロダクトに対して適用することが可能です。またOPAはServerとして起動するほかにも、Go Libraryとしてアプリケーションコードに組み込んだり、対話形式(REPL(Read-Eval-Print Loop))でポリシーのテストを実行することも可能です。
CNCF傘下のプロジェクト: OPAはCNCFがホストとして管理するプロダクトで、Security & Complianceのカテゴリに分類されています。同じカテゴリに含まれるプロダクトとしてはFalcoやNotaryなどがあり、2020年12月の時点でOPAのプロジェクトの成熟度は”Incubating”となっています。
OPAは以下のような構成となっています。上述の通り、クライアントがポリシーの検証を行う場合はJsonなどのデータをクエリとしてOPAに渡し、OPAの持つPolicyを元にテスト結果を返します。OPAで利用するJsonなどの階層型データはDocumentと呼ばれ、クライアントから投げられるDocumentをBase Document、OPAがポリシーを元に生成したDocumentをVirtual Documentと呼びます。
※画像:OPA公式ドキュメントより
※参考ドキュメント:
Kubernetes上でOPAを利用する場合
Kubernetes上でOPAを利用する場合、Admission Controllerを利用する方法とGatekeeperを利用する方法とに分かれます。今回はAdmission Controllerのほうを試してみました。
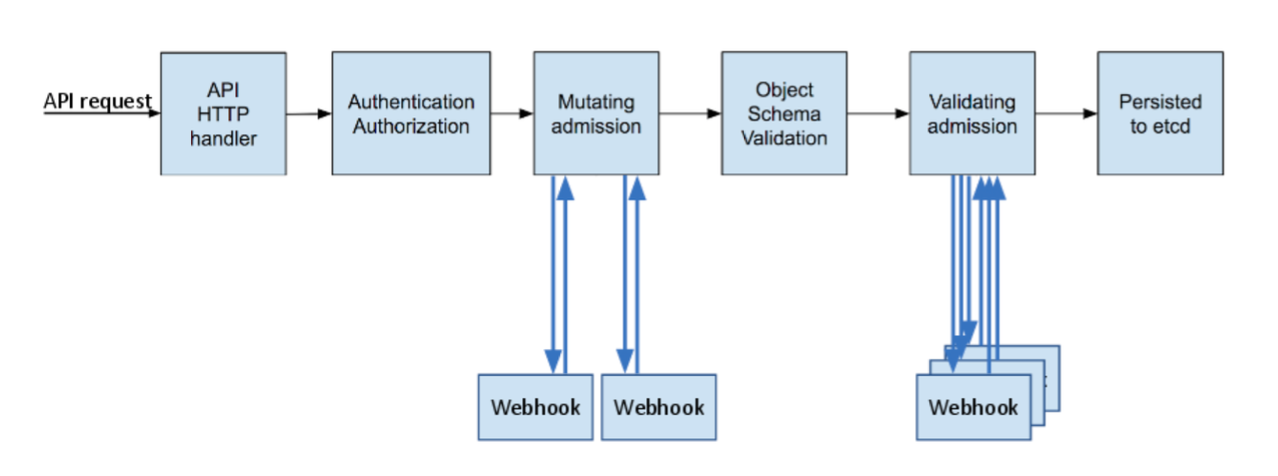
Admission ControllerはKubernetes API Serverにリクエスト制御を追加する機能で、APIリクエストに対する検証や変更、拒否などを実行することが可能になります。Admission Controlのプロセスは大きくMutating Admission Validating Admissionの2つに分かれ、MutatingAdmissionWebhookとValidatingAdmissionWebhookという2つのリソースを利用することで、それぞれのフェーズにおけるカスタムロジックを実装することができます。
※画像: Kubernetes公式ブログより

Admission ControllerはKubernetesに対してポリシーを施行する上でのベースとなります。OPAをAdmission Controllerとしてデプロイすることで、各Objectに対するポリシーのチェック(例:Labelの有無、特定のコンテナレジストリを指定しているか否か)、Objectの修正(例:Sidecarコンテナの追加)などを実行することができます。
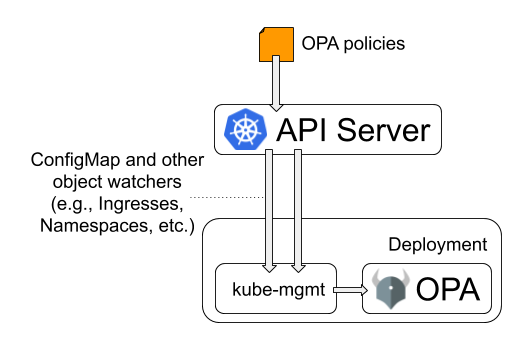
Kubernetes APIServerは、各Objectが作成・変更・削除されるたび、OPAへクエリを流すように設定されます。API ServerはWebhookリクエストにObjectの情報を付与してOPAへ送信し、OPAはAdmissionReviewRequestによって入力されたDocumentを評価し、AdmissionReviewResponseを生成・API Serverへ返信します。
Admission Controllerを利用する場合、kube-mgmtというソフトウェアをSidecarコンテナとして利用します。kube-mgmtはOPAにPolicyを読み込ませること・Kubernetes ObjectをOPAへ送ることを責務とし、API Serverからの通信はkube-mgmtを経由してOPAへと渡されます。kube-mgmtはConfigMapとして受け取ったPolicyをOPAへ渡し、動的にPolicyを更新することができます。
※画像:OPA公式ドキュメントより

OPAを使ってみる
ここからは実際にOPAを操作してみます。今回はOPAの公式ドキュメントで紹介されている2つの例(1つ目の例、2つ目の例)をなぞっていきます。
検証環境
- Kubernetesマネージドサービス: Amazon EKS (v1.18)
- 構築方法: eksctlによる構築
- ローカル環境: WSL (Ubuntu 18.04.4)
例1: Admission Controllerを利用しない場合
一つ目はAdmission Controllerを利用せず、OPAとPolicyだけを設定する場合です(ドキュメントはこちら)。この場合OPAはKubernetes Objectが作られるたびにそれらを評価しますが、Objectの作成や変更に対して許可・拒否するような動きはできません。
まずはOPAに設定するPolicyを用意します。ここではPodのホスト名を取得し、それを含めたメッセージを返す、というポリシーを指定します。
example.rego
package example

greeting = msg {
    info := opa.runtime()
    hostname := info.env["HOSTNAME"] # Kubernetes sets the HOSTNAME environment variable.
    msg := sprintf("hello from pod %q!", [hostname])
}
上記Regoファイルを指定してConfigMapを作成します。
# ConfigMap作成
$ kubectl create configmap example-policy --from-file example.rego
configmap/example-policy created


# 作成後の確認
$ kubectl get cm
NAME             DATA   AGE
example-policy   1      35s


$ kubectl describe cm example-policy
Name:         example-policy
Namespace:    default
Labels:       <none>
Annotations:  <none>

Data
====
example.rego:
----
package example

greeting = msg {
    info := opa.runtime()
    hostname := info.env["HOSTNAME"] # Kubernetes sets the HOSTNAME environment variable.
    msg := sprintf("hello from pod %q!", [hostname])
}
Events:  <none>
次にPodとして起動するOPAの定義ファイルを用意します。マニフェストファイルには、先ほど作成したConfigMapを指定し、マウントするよう設定しています。
deployment-opa.yaml
apiVersion: apps/v1
kind: Deployment
metadata:
  name: opa
  labels:
    app: opa
spec:
  replicas: 1
  selector:
    matchLabels:
      app: opa
  template:
    metadata:
      labels:
        app: opa
      name: opa
    spec:
      containers:
      - name: opa
        image: openpolicyagent/opa:latest
        ports:
        - name: http
          containerPort: 8181
        args:
        - "run"
        - "--ignore=.*"  # exclude hidden dirs created by Kubernetes
        - "--server"
        - "/policies"
        volumeMounts:
        - readOnly: true
          mountPath: /policies
          name: example-policy
      volumes:
      - name: example-policy
        configMap:
          name: example-policy
# Deployment作成
$ kubectl apply -f deployment-opa.yml
deployment.apps/opa created


# 作成後の確認
$ kubectl get pods
NAME                   READY   STATUS    RESTARTS   AGE
opa-754686d87c-d2rgs   1/1     Running   0          15s
OPAが無事に起動しました。次にOPAのAPIへアクセスできるよう、Serviceリソースを作成します。
service-opa.yaml
kind: Service
apiVersion: v1
metadata:
  name: opa
  labels:
    app: opa
spec:
  type: NodePort
  selector:
    app: opa
  ports:
    - name: http
      protocol: TCP
      port: 8181
      targetPort: 8181
$ kubectl apply -f service-opa.yml
service/opa created


$ kubectl get svc
NAME         TYPE        CLUSTER-IP      EXTERNAL-IP   PORT(S)          AGE
kubernetes   ClusterIP   172.20.0.1      <none>        443/TCP          6d3h
opa          NodePort    172.20.193.87   <none>        8181:30625/TCP   3s
Serviceが作成されましたが、今回はこれを一度編集しLoadBalancerへと変更しました。
# Serviceの編集 (type: LoadBalancerへ変更)
$ kubectl edit svc opa
service/opa edited


# 修正後の確認
$ kubectl get svc
NAME         TYPE           CLUSTER-IP      EXTERNAL-IP                                                                   PORT(S)          AGE
kubernetes   ClusterIP      172.20.0.1      <none>                                                                        443/TCP          6d3h
opa          LoadBalancer   172.20.193.87   a1b4926b227974c33a0f51c37c2a82a0-647219299.ap-northeast-1.elb.amazonaws.com   8181:30625/TCP   71s
これでOPAにアクセスできるので、以下のようなコマンドを実行し、OPAのAPIへアクセスします。
$ curl a1b4926b227974c33a0f51c37c2a82a0-647219299.ap-northeast-1.elb.amazonaws.com:8181/v1/data
{"result":{"example":{"greeting":"hello from pod \"opa-754686d87c-d2rgs\"!"}}}
無事にアクセスし、Podのホスト名がメッセージに含まれることも確認できました。
例2: Admission Controllerを利用する場合
次にAdmission Controllerを利用する場合を見てみます(ドキュメントはこちら)。今回はValidatingAdmissionWebhookを利用し、特定の条件を満たす・満たさないObjectの作成を拒否するような例です。
なお、こちらは公式ドキュメントをなぞるだけだとうまくいかないため(ValidatingAdmissionWebhookのバージョンが古いため?)、以下のドキュメントも参照しながら進めました。
※参考ドキュメント:
Namespace作成とContext切り替え
まずはOPA専用のNamespaceを用意し、kubectl configコマンドを利用してContextを作成・変更します。
# Namespaceの作成
$ kubectl create namespace opa
namespace/opa created


$ kubectl get ns
NAME              STATUS   AGE
default           Active   29m
kube-node-lease   Active   29m
kube-public       Active   29m
kube-system       Active   29m
opa               Active   2s

# kubectl configの確認
$ kubectl config view

(中略)

contexts:
- context:
    cluster: eks-cluster.ap-northeast-1.eksctl.io
    user: testuser@eks-cluster.ap-northeast-1.eksctl.io
  name: testuser@eks-cluster.ap-northeast-1.eksctl.io
current-context: testuser@eks-cluster.ap-northeast-1.eksctl.io

(中略)

# Contextの作成
$ kubectl config set-context opa-tutorial --user testuser@eks-cluster.ap-northeast-1.eksctl.io --cluster eks-cluster.ap-northeast-1.eksctl.io --namespace opa
Context "opa-tutorial" created.


# Contextの切り替え
$ kubectl config use-context opa-tutorial
Switched to context "opa-tutorial".


# 切り替え後の確認
$ kubectl config view

(中略)

contexts:
- context:
    cluster: eks-cluster.ap-northeast-1.eksctl.io
    namespace: opa
    user: testuser@eks-cluster.ap-northeast-1.eksctl.io
  name: opa-tutorial
- context:
    cluster: eks-cluster.ap-northeast-1.eksctl.io
    user: testuser@eks-cluster.ap-northeast-1.eksctl.io
  name: testuser@eks-cluster.ap-northeast-1.eksctl.io
current-context: opa-tutorial

(中略)
TLS Certificateの用意
次にAdmission ControllerとOPAとを通信させる準備を行います。Admission WebhookはHTTPSでアクセスしなければならないため、各種証明書を用意します。今回はopensslコマンドを利用します。
# 作業フォルダの用意
$ mkdir opa
$ cd opa


# 秘密鍵・CSRの作成
$ openssl genrsa -out ca.key 2048
Generating RSA private key, 2048 bit long modulus (2 primes)
...............................+++++
......+++++
e is 65537 (0x010001)

$ openssl req -x509 -new -nodes -key ca.key -days 100000 -out ca.crt -subj "/CN=admission_ca"
Cant load /home/testuser/.rnd into RNG
140456210534848:error:2406F079:random number generator:RAND_load_file:Cannot open file:../crypto/rand/randfile.c:88:Filename=/home/testuser/.rnd


# TLS key / 証明書の作成
$ cat server.conf
[req]
req_extensions = v3_req
distinguished_name = req_distinguished_name
[req_distinguished_name]
[ v3_req ]
basicConstraints = CA:FALSE
keyUsage = nonRepudiation, digitalSignature, keyEncipherment
extendedKeyUsage = clientAuth, serverAuth


$ openssl genrsa -out server.key 2048
Generating RSA private key, 2048 bit long modulus (2 primes)
..................+++++
......................+++++
e is 65537 (0x010001)

$ openssl req -new -key server.key -out server.csr -subj "/CN=opa.opa.svc" -config server.conf

$ openssl x509 -req -in server.csr -CA ca.crt -CAkey ca.key -CAcreateserial -out server.crt -days 100000 -extensions v3_req -extfile server.conf
Signature ok
subject=CN = opa.opa.svc
Getting CA Private Key
上記作業で作成したファイルを利用してSecretリソースを作成し、TLS CredentialsをOPAに渡せるようにします。
$ kubectl create secret tls opa-server --cert=server.crt --key=server.key
secret/opa-server created

$ kubectl get secret
NAME                  TYPE                                  DATA   AGE
default-token-kprlq   kubernetes.io/service-account-token   3      9m20s
opa-server            kubernetes.io/tls                     2      8s
OPAのデプロイ
次にAdmission ControllerとしてOPAをデプロイするため、以下のマニフェストファイルを用意します。こちらはOPAのドキュメントから一部記載を変更しています。
OPAコンテナは、先ほどの1つ目の例と異なり、HTTPS通信を行うための設定が追加されています。また、こちらの例ではkube-mgmtがコンテナとして追加されています。--replicate-cluster --replicateオプションでOPAへReplicateするObjectを限定しており、それぞれNamespace Ingressを指定しています。
ConfigMapではデフォルトのPolicyを設定しており、ここではAdmissionの結果がdenyとなった場合はその理由を、それ以外は”allowed: trueのメッセージを返す、という設定となっています。
admission-controller.yaml
# Grant OPA/kube-mgmt read-only access to resources. This lets kube-mgmt
# replicate resources into OPA so they can be used in policies.
kind: ClusterRoleBinding
apiVersion: rbac.authorization.k8s.io/v1
metadata:
  name: opa-viewer
roleRef:
  kind: ClusterRole
  name: view
  apiGroup: rbac.authorization.k8s.io
subjects:
- kind: Group
  name: system:serviceaccounts:opa
  apiGroup: rbac.authorization.k8s.io
---
# Define role for OPA/kube-mgmt to update configmaps with policy status.
kind: Role
apiVersion: rbac.authorization.k8s.io/v1
metadata:
  namespace: opa
  name: configmap-modifier
rules:
- apiGroups: [""]
  resources: ["configmaps"]
  verbs: ["update", "patch"]
---
# Grant OPA/kube-mgmt role defined above.
kind: RoleBinding
apiVersion: rbac.authorization.k8s.io/v1
metadata:
  namespace: opa
  name: opa-configmap-modifier
roleRef:
  kind: Role
  name: configmap-modifier
  apiGroup: rbac.authorization.k8s.io
subjects:
- kind: Group
  name: system:serviceaccounts:opa
  apiGroup: rbac.authorization.k8s.io
---
kind: Service
apiVersion: v1
metadata:
  name: opa
  namespace: opa
spec:
  selector:
    app: opa
  ports:
  - name: https
    protocol: TCP
    port: 443
    targetPort: 443
---
apiVersion: apps/v1
kind: Deployment
metadata:
  labels:
    app: opa
  namespace: opa
  name: opa
spec:
  replicas: 1
  selector:
    matchLabels:
      app: opa
  template:
    metadata:
      labels:
        app: opa
      name: opa
    spec:
      containers:
        # WARNING: OPA is NOT running with an authorization policy configured. This
        # means that clients can read and write policies in OPA. If you are
        # deploying OPA in an insecure environment, be sure to configure
        # authentication and authorization on the daemon. See the Security page for
        # details: https://www.openpolicyagent.org/docs/security.html.
        - name: opa
          image: openpolicyagent/opa:latest
          args:
            - "run"
            - "--server"
            - "--tls-cert-file=/certs/tls.crt"
            - "--tls-private-key-file=/certs/tls.key"
            - "--addr=0.0.0.0:443"
            - "--addr=http://127.0.0.1:8181"
            - "--log-format=json-pretty"
            - "--set=decision_logs.console=true"
          volumeMounts:
            - readOnly: true
              mountPath: /certs
              name: opa-server
          readinessProbe:
            httpGet:
              path: /health?plugins&bundle
              scheme: HTTPS
              port: 443
            initialDelaySeconds: 3
            periodSeconds: 5
          livenessProbe:
            httpGet:
              path: /health
              scheme: HTTPS
              port: 443
            initialDelaySeconds: 3
            periodSeconds: 5
        - name: kube-mgmt
          image: openpolicyagent/kube-mgmt:0.11
          args:
            - "--replicate-cluster=v1/namespaces"
            - "--replicate=extensions/v1beta1/ingresses"
      volumes:
        - name: opa-server
          secret:
            secretName: opa-server
---
kind: ConfigMap
apiVersion: v1
metadata:
  name: opa-default-system-main
  namespace: opa
# apiVersion: v1beta1 to v1
data:
  main: |
    package system

    import data.kubernetes.admission

    main = {
      "apiVersion": "admission.k8s.io/v1",  # v1beta1から変更
      "kind": "AdmissionReview",
      "response": response,
    }

    default uid = ""

    uid = input.request.uid

    response = {
        "allowed": false,
        "uid": uid,
        "status": {
            "reason": reason,
        },
    } {
        reason = concat(", ", admission.deny)
        reason != ""
    }
    else = {"allowed": true, "uid": uid}
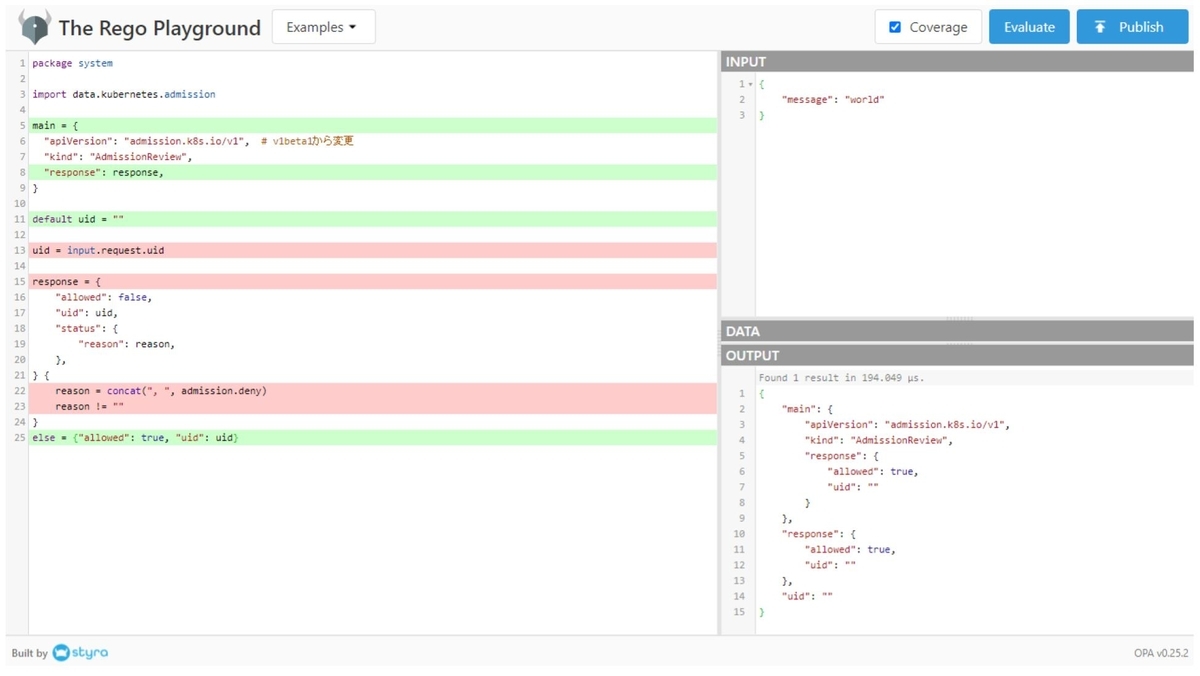
なお、Regoをテストする環境としてRego Playgroundというものが、OPAの開発元であるStyra社から提供されており、こちらで簡単にテストを行うことができます。
上記マニフェストファイルで組み込んでいるPolicyをテストすると、以下のように動作を確認することができます。
※画像:Rego Playgroundでの実行結果(リンクはこちら)

上記マニフェストファイルをデプロイします。
# OPAデプロイ
$ kubectl apply -f admission-controller.yaml
clusterrolebinding.rbac.authorization.k8s.io/opa-viewer created
role.rbac.authorization.k8s.io/configmap-modifier created
rolebinding.rbac.authorization.k8s.io/opa-configmap-modifier created
service/opa created
deployment.apps/opa created
configmap/opa-default-system-main created


# デプロイ後の確認
$ kubectl get pods
NAME                   READY   STATUS    RESTARTS   AGE
opa-6cfd4b6797-ttwnv   2/2     Running   0          23s


$ kubectl describe pod opa-6cfd4b6797-ttwnv
Name:         opa-6cfd4b6797-ttwnv
Namespace:    opa
Priority:     0
Node:         ip-192-168-2-241.ap-northeast-1.compute.internal/192.168.2.241
Start Time:   Sat, 26 Dec 2020 14:32:03 +0900
Labels:       app=opa
              pod-template-hash=6cfd4b6797
Annotations:  kubernetes.io/psp: eks.privileged
Status:       Running
IP:           192.168.2.126
IPs:
  IP:           192.168.2.126
Controlled By:  ReplicaSet/opa-6cfd4b6797
Containers:
  opa:
    Container ID:  docker://1b0aff5054362e51eaee4e4a7768488d29bcb737648d7e08487e6ebba9419593
    Image:         openpolicyagent/opa:latest
    Image ID:      docker-pullable://openpolicyagent/opa@sha256:d5b2a82662ce18c3456645b73519592835c96e5493c0ebf35e7dcbc5474c730b
    Port:          <none>
    Host Port:     <none>
    Args:
      run
      --server
      --tls-cert-file=/certs/tls.crt
      --tls-private-key-file=/certs/tls.key
      --addr=0.0.0.0:443
      --addr=http://127.0.0.1:8181
      --log-format=json-pretty
      --set=decision_logs.console=true
    State:          Running
      Started:      Sat, 26 Dec 2020 14:32:09 +0900
    Ready:          True
    Restart Count:  0
    Liveness:       http-get https://:443/health delay=3s timeout=1s period=5s #success=1 #failure=3
    Readiness:      http-get https://:443/health%3Fplugins&bundle delay=3s timeout=1s period=5s #success=1 #failure=3
    Environment:    <none>
    Mounts:
      /certs from opa-server (ro)
      /var/run/secrets/kubernetes.io/serviceaccount from default-token-kprlq (ro)
  kube-mgmt:
    Container ID:  docker://1e2afda1101a01d9a4c7b536289e6bafbbcefe8ab156f0f6f09251854dd695ec
    Image:         openpolicyagent/kube-mgmt:0.11
    Image ID:      docker-pullable://openpolicyagent/kube-mgmt@sha256:6ac4d979fda61e15123b43e8e6d2cd6163f3ae0f6dcf1785a8507012d827f8a3
    Port:          <none>
    Host Port:     <none>
    Args:
      --replicate-cluster=v1/namespaces
      --replicate=extensions/v1beta1/ingresses
    State:          Running
      Started:      Sat, 26 Dec 2020 14:32:16 +0900
    Ready:          True
    Restart Count:  0
    Environment:    <none>
    Mounts:
      /var/run/secrets/kubernetes.io/serviceaccount from default-token-kprlq (ro)
Conditions:
  Type              Status
  Initialized       True
  Ready             True
  ContainersReady   True
  PodScheduled      True
Volumes:
  opa-server:
    Type:        Secret (a volume populated by a Secret)
    SecretName:  opa-server
    Optional:    false
  default-token-kprlq:
    Type:        Secret (a volume populated by a Secret)
    SecretName:  default-token-kprlq
    Optional:    false
QoS Class:       BestEffort
Node-Selectors:  <none>
Tolerations:     node.kubernetes.io/not-ready:NoExecute for 300s
                 node.kubernetes.io/unreachable:NoExecute for 300s
Events:
  Type    Reason     Age   From                                                       Message
  ----    ------     ----  ----                                                       -------
  Normal  Scheduled  34s   default-scheduler                                          Successfully assigned opa/opa-6cfd4b6797-ttwnv to ip-192-168-2-241.ap-northeast-1.compute.internal
  Normal  Pulling    33s   kubelet, ip-192-168-2-241.ap-northeast-1.compute.internal  Pulling image "openpolicyagent/opa:latest"
  Normal  Pulled     29s   kubelet, ip-192-168-2-241.ap-northeast-1.compute.internal  Successfully pulled image "openpolicyagent/opa:latest"
  Normal  Created    28s   kubelet, ip-192-168-2-241.ap-northeast-1.compute.internal  Created container opa
  Normal  Started    28s   kubelet, ip-192-168-2-241.ap-northeast-1.compute.internal  Started container opa
  Normal  Pulling    28s   kubelet, ip-192-168-2-241.ap-northeast-1.compute.internal  Pulling image "openpolicyagent/kube-mgmt:0.11"
  Normal  Pulled     22s   kubelet, ip-192-168-2-241.ap-northeast-1.compute.internal  Successfully pulled image "openpolicyagent/kube-mgmt:0.11"
  Normal  Created    21s   kubelet, ip-192-168-2-241.ap-northeast-1.compute.internal  Created container kube-mgmt
  Normal  Started    21s   kubelet, ip-192-168-2-241.ap-northeast-1.compute.internal  Started container kube-mgmt
次にOPAをAdmission Controllerとして機能させるために必要なValidatingWebhookConfigurationを用意します。こちらはOPAの公式ドキュメントではapiVersion: admissionregistration.k8s.io/v1beta1となっていますが、今回はadmissionregistration.k8s.io/v1に変更しています。またそれに合わせ、webhooks.admissionReviewVersions webhooks.sideEffectsという2つの必須フィールドを追加しています。
以下の設定では、特定のラベル(openpolicyagent.org/webhook=ignore)が付与されたNamespaceを除き、Create Updateの操作を行う全てのリソースに対してPolicyを適用します。
またwebhooks.clientConfig.caBundleではca.crtをBase64でエンコードした値を設定します。
webhook-configuration.yaml
kind: ValidatingWebhookConfiguration
apiVersion: admissionregistration.k8s.io/v1
metadata:
  name: opa-validating-webhook
webhooks:
  - name: validating-webhook.openpolicyagent.org
    namespaceSelector:
      matchExpressions:
      - key: openpolicyagent.org/webhook
        operator: NotIn
        values:
        - ignore
    rules:
      - operations: ["CREATE", "UPDATE"]
        apiGroups: ["*"]
        apiVersions: ["*"]
        resources: ["*"]
    clientConfig:
      caBundle: "<base64-encoded ca.crt>"
      service:
        namespace: opa
        name: opa
    admissionReviewVersions: ["v1", "v1beta1"]
    sideEffects: None
まずは上記ルールが該当すると動作に影響の出てしまうkube-system opaの2つのNamespaceに対してラベルを付与します。
$ kubectl label ns kube-system openpolicyagent.org/webhook=ignore
namespace/kube-system labeled

$ kubectl label ns opa openpolicyagent.org/webhook=ignore
namespace/opa labeled

$ kubectl get ns --show-labels
NAME              STATUS   AGE   LABELS
default           Active   54m   <none>
kube-node-lease   Active   54m   <none>
kube-public       Active   54m   <none>
kube-system       Active   54m   openpolicyagent.org/webhook=ignore
opa               Active   25m   openpolicyagent.org/webhook=ignore
上記マニフェストファイルをデプロイします。
$ kubectl apply -f webhook-configuration.yaml
validatingwebhookconfiguration.admissionregistration.k8s.io/opa-validating-webhook created
デプロイ後にOPAのログを確認してみます。
$ kubectl get pods
NAME                   READY   STATUS    RESTARTS   AGE
opa-6cfd4b6797-ttwnv   2/2     Running   0          8m20s


$ kubectl logs -l app=opa -c opa -f
  "level": "info",
  "msg": "Sent response.",
  "req_id": 227,
  "req_method": "POST",
  "req_path": "/",
  "resp_bytes": 134,
  "resp_duration": 0.814134,
  "resp_status": 200,
  "time": "2020-12-26T05:40:43Z"
}
{
  "client_addr": "192.168.2.241:46690",
  "level": "info",
  "msg": "Received request.",
  "req_id": 228,
  "req_method": "GET",
  "req_path": "/health",
  "time": "2020-12-26T05:40:43Z"
}
{
  "client_addr": "192.168.2.241:46690",
  "level": "info",
  "msg": "Sent response.",
  "req_id": 228,
  "req_method": "GET",
  "req_path": "/health",
  "resp_bytes": 2,
  "resp_duration": 0.373116,
  "resp_status": 200,
  "time": "2020-12-26T05:40:43Z"
}
{
  "client_addr": "192.168.2.241:46704",
  "level": "info",
  "msg": "Received request.",
  "req_id": 229,
  "req_method": "GET",
  "req_path": "/health",
  "time": "2020-12-26T05:40:47Z"
}
{
  "client_addr": "192.168.2.241:46704",
  "level": "info",
  "msg": "Sent response.",
  "req_id": 229,
  "req_method": "GET",
  "req_path": "/health",
  "resp_bytes": 2,
  "resp_duration": 0.347135,
  "resp_status": 200,
  "time": "2020-12-26T05:40:47Z"
}
{
  "client_addr": "192.168.2.241:46708",
  "level": "info",
  "msg": "Received request.",
  "req_id": 230,
  "req_method": "GET",
  "req_path": "/health",
  "time": "2020-12-26T05:40:48Z"
}
{
  "client_addr": "192.168.2.241:46708",
  "level": "info",
  "msg": "Sent response.",
  "req_id": 230,
  "req_method": "GET",
  "req_path": "/health",
  "resp_bytes": 2,
  "resp_duration": 0.643688,
  "resp_status": 200,
  "time": "2020-12-26T05:40:48Z"
}
^C
Admission Controlのテスト
ここから設定したAdmission Controlが機能するかをテストしてみます。今回はingressで利用できるホスト名を制限するようなPolicyを作成します。
ingress-whitelist.rego
package kubernetes.admission

import data.kubernetes.namespaces

operations = {"CREATE", "UPDATE"}

deny[msg] {
    input.request.kind.kind == "Ingress"
    operations[input.request.operation]
    host := input.request.object.spec.rules[_].host
    not fqdn_matches_any(host, valid_ingress_hosts)
    msg := sprintf("invalid ingress host %q", [host])
}

valid_ingress_hosts = {host |
    whitelist := namespaces[input.request.namespace].metadata.annotations["ingress-whitelist"]
    hosts := split(whitelist, ",")
    host := hosts[_]
}

fqdn_matches_any(str, patterns) {
    fqdn_matches(str, patterns[_])
}

fqdn_matches(str, pattern) {
    pattern_parts := split(pattern, ".")
    pattern_parts[0] == "*"
    str_parts := split(str, ".")
    n_pattern_parts := count(pattern_parts)
    n_str_parts := count(str_parts)
    suffix := trim(pattern, "*.")
    endswith(str, suffix)
}

fqdn_matches(str, pattern) {
    not contains(pattern, "*")
    str == pattern
}
上記Regoファイルを利用し、ConfigMapを作成します。ConfigMap作成後、リソースの状態を確認すると、Policyとして登録されたかどうかがAnnotation(openpolicyagent.org/policy-status)に付与されます。
# ConfigMap作成
$ kubectl create configmap ingress-whitelist --from-file=ingress-whitelist.rego
configmap/ingress-whitelist created


# 作成後の確認
$ kubectl get cm
NAME                      DATA   AGE
ingress-whitelist         1      6s
opa-default-system-main   1      20m


$ kubectl get configmap ingress-whitelist -o yaml
apiVersion: v1
data:
  ingress-whitelist.rego: "package kubernetes.admission\r\n\r\nimport data.kubernetes.namespaces\r\n\r\noperations
    = {\"CREATE\", \"UPDATE\"}\r\n\r\ndeny[msg] {\r\n\tinput.request.kind.kind ==
    \"Ingress\"\r\n\toperations[input.request.operation]\r\n\thost := input.request.object.spec.rules[_].host\r\n\tnot
    fqdn_matches_any(host, valid_ingress_hosts)\r\n\tmsg := sprintf(\"invalid ingress
    host %q\", [host])\r\n}\r\n\r\nvalid_ingress_hosts = {host |\r\n\twhitelist :=
    namespaces[input.request.namespace].metadata.annotations[\"ingress-whitelist\"]\r\n\thosts
    := split(whitelist, \",\")\r\n\thost := hosts[_]\r\n}\r\n\r\nfqdn_matches_any(str,
    patterns) {\r\n\tfqdn_matches(str, patterns[_])\r\n}\r\n\r\nfqdn_matches(str,
    pattern) {\r\n\tpattern_parts := split(pattern, \".\")\r\n\tpattern_parts[0] ==
    \"*\"\r\n\tstr_parts := split(str, \".\")\r\n\tn_pattern_parts := count(pattern_parts)\r\n\tn_str_parts
    := count(str_parts)\r\n\tsuffix := trim(pattern, \"*.\")\r\n\tendswith(str, suffix)\r\n}\r\n\r\nfqdn_matches(str,
    pattern) {\r\n    not contains(pattern, \"*\")\r\n    str == pattern\r\n}"
kind: ConfigMap
metadata:
  annotations:
    openpolicyagent.org/policy-status: '{"status":"ok"}'  # Policyの追加が成功している
  creationTimestamp: "2020-12-26T05:52:00Z"
  managedFields:
  - apiVersion: v1
    fieldsType: FieldsV1
    fieldsV1:
      f:metadata:
        f:annotations:
          .: {}
          f:openpolicyagent.org/policy-status: {}
    manager: kube-mgmt
    operation: Update
    time: "2020-12-26T05:52:00Z"
  - apiVersion: v1
    fieldsType: FieldsV1
    fieldsV1:
      f:data:
        .: {}
        f:ingress-whitelist.rego: {}
    manager: kubectl
    operation: Update
    time: "2020-12-26T05:52:00Z"
  name: ingress-whitelist
  namespace: opa
  resourceVersion: "11734"
  selfLink: /api/v1/namespaces/opa/configmaps/ingress-whitelist
  uid: 6810a1e8-d817-4293-95d0-08644bdff5da
Policyを設定したのでKubernetes Objectを作成します。今回はingressリソースを異なるNamespaceに作成し、それぞれのNamespaceのAnnotationで指定したホスト名と一致しないものをingressが利用した場合は、作成を却下します。
以下のマニフェストファイルを用意します。
qa-namespace.yaml
apiVersion: v1
kind: Namespace
metadata:
  annotations:
    ingress-whitelist: "*.qa.acmecorp.com,*.internal.acmecorp.com"
  name: qa
production-namespace.yaml
apiVersion: v1
kind: Namespace
metadata:
  annotations:
    ingress-whitelist: "*.acmecorp.com"
  name: production
ingress-ok.yaml
apiVersion: extensions/v1beta1
kind: Ingress
metadata:
  name: ingress-ok
spec:
  rules:
  - host: signin.acmecorp.com
    http:
      paths:
      - backend:
          serviceName: nginx
          servicePort: 80
ingress-bad.yaml
apiVersion: extensions/v1beta1
kind: Ingress
metadata:
  name: ingress-bad
spec:
  rules:
  - host: acmecorp.com
    http:
      paths:
      - backend:
          serviceName: nginx
          servicePort: 80
上記マニフェストファイルをデプロイします。まずはNamespaceを作成します。
# Namespaceの作成
$ kubectl apply -f qa-namespace.yaml
namespace/qa created

$ kubectl apply -f production-namespace.yaml
namespace/production created

$ kubectl get ns
NAME              STATUS   AGE
default           Active   69m
kube-node-lease   Active   69m
kube-public       Active   69m
kube-system       Active   69m
opa               Active   40m
production        Active   4s
qa                Active   14s
次にingressを作成します。するとingress-ok.yamlは無事に作成できる一方、ingress-bad.yamlのほうはエラーメッセージが表示されます。メッセージを見るとAdmission Webhookがリクエストを拒否したと表示されており、OPA(+Admission Controller)が正しく機能していることが分かります。
# ingressの作成(成功)
$ kubectl create -f ingress-ok.yaml -n production
ingress.extensions/ingress-ok created

$ kubectl get ingress -A
NAMESPACE    NAME         CLASS    HOSTS                 ADDRESS   PORTS   AGE
production   ingress-ok   <none>   signin.acmecorp.com             80      11s


# ingressの作成(失敗)
$ kubectl create -f ingress-bad.yaml -n qa
Error from server (invalid ingress host "acmecorp.com"): error when creating "ingress-bad.yaml": admission webhook "validating-webhook.openpolicyagent.org" denied the request: invalid ingress host "acmecorp.com"
Policyの修正とテスト
OPAは他のアプリケーションに影響を与えることなくPolicyを更新することができます。ここではingressが異なるNamespaceで同じホスト名を所有する場合、その作成を却下するようなPolicyを設定します。
ingress-conflict.rego
package kubernetes.admission

import data.kubernetes.ingresses

deny[msg] {
    some other_ns, other_ingress
    input.request.kind.kind == "Ingress"
    input.request.operation == "CREATE"
    host := input.request.object.spec.rules[_].host
    ingress := ingresses[other_ns][other_ingress]
    other_ns != input.request.namespace
    ingress.spec.rules[_].host == host
    msg := sprintf("invalid ingress host %q (conflicts with %v/%v)", [host, other_ns, other_ingress])
}
上記regoファイルを利用してConfigMapを作成します。
# ConfigMapの作成
$ kubectl create configmap ingress-conflicts --from-file=ingress-conflicts.rego
configmap/ingress-conflicts created


# 作成後の確認
$ kubectl get cm
NAME                      DATA   AGE
ingress-conflicts         1      3s
ingress-whitelist         1      8m10s
opa-default-system-main   1      28m


$ kubectl get configmap ingress-conflicts -o yaml
apiVersion: v1
data:
  ingress-conflicts.rego: "package kubernetes.admission\r\n\r\nimport data.kubernetes.ingresses\r\n\r\ndeny[msg]
    {\r\n    some other_ns, other_ingress\r\n    input.request.kind.kind == \"Ingress\"\r\n
    \   input.request.operation == \"CREATE\"\r\n    host := input.request.object.spec.rules[_].host\r\n
    \   ingress := ingresses[other_ns][other_ingress]\r\n    other_ns != input.request.namespace\r\n
    \   ingress.spec.rules[_].host == host\r\n    msg := sprintf(\"invalid ingress
    host %q (conflicts with %v/%v)\", [host, other_ns, other_ingress])\r\n}"
kind: ConfigMap
metadata:
  annotations:
    openpolicyagent.org/policy-status: '{"status":"ok"}'
  creationTimestamp: "2020-12-26T06:00:07Z"
  managedFields:
  - apiVersion: v1
    fieldsType: FieldsV1
    fieldsV1:
      f:metadata:
        f:annotations:
          .: {}
          f:openpolicyagent.org/policy-status: {}
    manager: kube-mgmt
    operation: Update
    time: "2020-12-26T06:00:07Z"
  - apiVersion: v1
    fieldsType: FieldsV1
    fieldsV1:
      f:data:
        .: {}
        f:ingress-conflicts.rego: {}
    manager: kubectl
    operation: Update
    time: "2020-12-26T06:00:07Z"
  name: ingress-conflicts
  namespace: opa
  resourceVersion: "13099"
  selfLink: /api/v1/namespaces/opa/configmaps/ingress-conflicts
  uid: 1dc3f286-5b49-4db1-9510-cbcb74d8bffa
ConfigMapの作成とPolicyの読み込みが成功したので、実際の動作をテストします。以下のようなマニフェストファイルを用いて新しいNamespaceを作成し、先ほど利用したingress-ok.yamlを、作成したNamespaceへデプロイします。すると、すでに同一のホスト名が使用されているため、エラーが返されます。
staging-namespace.yaml
apiVersion: v1
kind: Namespace
metadata:
  annotations:
    ingress-whitelist: "*.acmecorp.com"
  name: staging
# Namespaceの作成
$ kubectl apply -f staging-namespace.yaml
namespace/staging created

$ kubectl get ns
NAME              STATUS   AGE
default           Active   78m
kube-node-lease   Active   78m
kube-public       Active   78m
kube-system       Active   78m
opa               Active   49m
production        Active   9m2s
qa                Active   9m12s
staging           Active   5s


# ingressの作成(失敗)
$ kubectl create -f ingress-ok.yaml -n staging
Error from server (invalid ingress host "signin.acmecorp.com" (conflicts with production/ingress-ok)): error when creating "ingress-ok.yaml": admission webhook "validating-webhook.openpolicyagent.org" denied the request: invalid ingress host "signin.acmecorp.com" (conflicts with production/ingress-ok)
上記の通り、更新したPolicyも想定通り動作することが確認できました。
